Wednesday, August 27, 2008

Baby Quilt Top Done! Yaay!

Phew! My Gram's Fairy Tale baby quilt is done! I bought this kit from Fabric.com ages ago, and I've been progressing slowly with it for a long long while. I mentioned this quilt previously in a post here.

I dug it out of cold storage and started working on it again. The tedious bit was joining the triangles that made up the outer borders and joining them to the main body required some concentration - matching points, making sure that the points don't get cut off, easing in, etc...

Amanda Jean inspired me to work on this baby quilt with her Theme of the week. Although I'm a couple of days late in delivering this baby, there's nothing for me to lose as the top is now completed! :>

The instructions are clear and easy to follow and I do love the blocks and the fairy tale prints. I'm looking forward to basting and quilting than the Queen-sized Star QAL one :p

Sorry for the poor lighting again. Took this picture at around 3am in the morning when I put in the last stitch in the border. Well, the title of my blog is MIDNIGHT CRAFTS indeed! ;>

Tuesday, August 19, 2008

Star QAL Top DONE


Okay, I'm sorry that I could not take a better picture. But the weather has been dreary and wet for the past 2 days and I only have my mobile phone handy now :p I will try to get a better picture when I have more hands on deck to hold this baby up! :>

The top is DONE DONE. I'm so glad!!! But it is HUGE. My back is already aching just THINKING of the basting I have to do on my hands and knees :p

I'm not in a hurry to quilt this one yet. I will probably quilt it when I complete my Zoo Stack and Whack baby quilt top, buy a few more needles and get into the mood before I tackle the quilting.

Thanks to AmandaJean, this has been fun, fun, fun :> Yes, its true that you can work out a quilt all by yourself. But when you have so many others quilting along with you, and someone committing herself to lead this project, you appreciate the effort and heart in this :>

Already looking forward to the next project! WOOHOO!

Sunday, August 17, 2008

Good Buy

I have a small working area and a smaller ironing board. and I HATE it when the wire gets in the way (and cause more creases) when I have to press those backings or bigger quilts.

And I found this beauty at the departmental store today. It costs about US$40.00 and I HAD to have it. It is a medium weight dry iron, different from my regular steam iron (I don't use the steam function for the quilts) which weighs next to nothing :p These lightweight steam irons are good for clothes, but not quite the thing when it comes to quilts!

Hubby was surprised that I would want an iron this heavy :p I explained that quilting is about PRESSING, not'ironing'... I think that left him more confused than ever! haha.

I've just applied the border to one side of my Star QAL and I'd love to try out this iron on the quilt then. I have not fired up this baby yet - not in the greatest shape to stay up in the studio tonight and sitting at the machine. I think I'm coming down with a flu or something... throat's a little scratchy and bones a little achy... not in the mood to get on the floor to pin the borders on tonight. Guess I will continue with my handquilting my sampler in bed then! ;>

Have a great week ahead!

Monday, August 11, 2008

About Stars and Sashiko

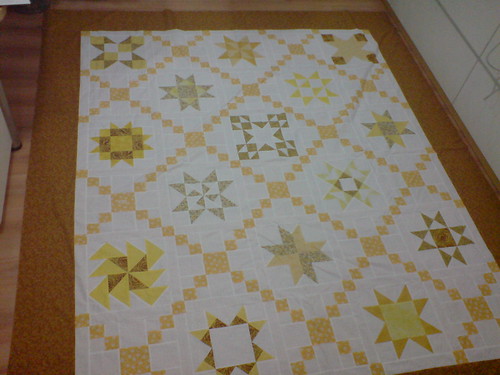
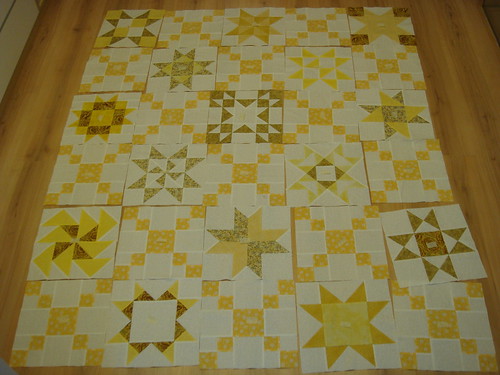
I've made some progress with my Star Quilt-A-Long project and I'm happy to say that I have completed all 30 blocks and cut up all my sashings/cornerstones, waiting for sewing now :>

There has been a number of completed tops at the group's flickr folder and I thought that the quilt is 'too square' to fit into any rooms in the house. haha. A quick calculation shows that I can turn this into a Queen-sized quilt with an additional row. So, I added 2 more Stars and 3 more setting blocks.

And I also took some time to pick out my border and backing fabrics too, and they are washed and ready to go when I'm done piecing the top together.

You can see the preliminary layout below, without the sashings/cornerstones/borders. I have a piece of tape on each block to indicate which row/column they belong to, so I don't have to bother with laying them out again until they are joined.


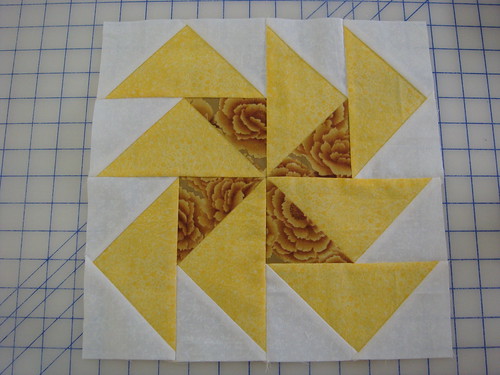
Here are my 2 additional blocks - Dutchman's puzzle and a 9-patch star.
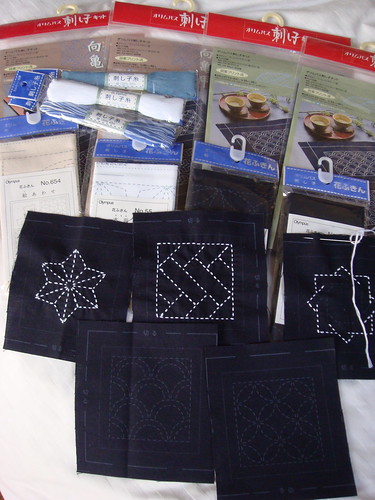
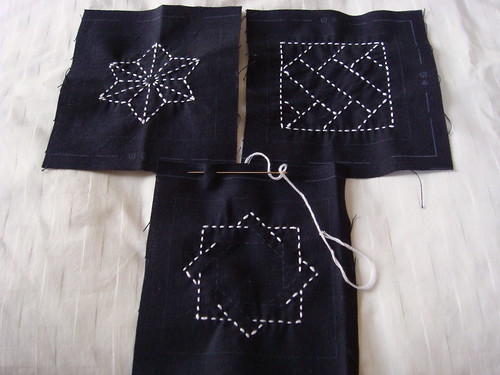
Recently, I found that my quilt shop carries Sashiko needles and I got really excited (for nothing). Unfortunately, the shop does NOT carry the Sashko kits/fabrics or even threads. It has been very painful looking for Sashiko stuffs in our local craft shops . And that of course gave me an excuse to shop online ;> Bought a bunch of placemat kits, some samplers and also sashiko threads. Of course, I did not have the patience to get my camera and snap a picture of the parcel as-is, but I remembered to take a pic of my spree here after I started stitching on a few coasters.

I felt that the threads supplied in the kit are not as good as the ones that you buy 'ala carte'. They seem to be more loosely twisted and a bit harder to pull through the fabric. So I'll probably just buy the sampler or the marked fabrics in the future. This is my 1st attempt at Sashiko sewing, though I've known of it for a while. Never got the chance to try my hands at i till now, because they are almost impossible to find in Singapore.

Then I visited the bookstore and bought The Ultimate Sashiko Sourcebook by Susan Briscoe which is really packed with loads of Sashiko history and patterns for reference. I. Love. It.


Loads of WIPs since the beginning of the year, and I sure hope I have more finished projects to show for in the coming months.

Thanks for sewing with me!