Friday, December 19, 2008

Good Buys 2

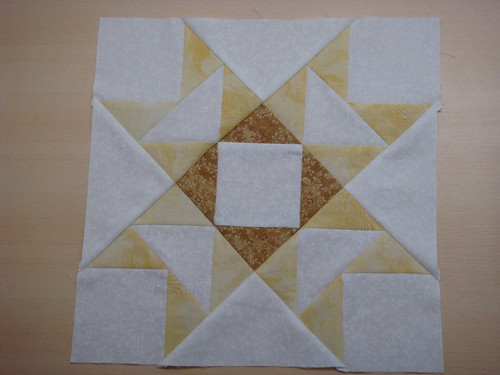
December has been a month of crafty indulgence for me :>

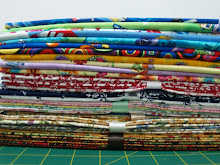
Well, I haven't given into temptations YET with all the online fabric stores' sales & coupons. But I have been checking out the local crafting supplies stores, stocking up on notions and what-nots.

A couple of weeks ago, I visited a local store in Chinatown. They sell loads & loads & loads of Clover products that made me a very very very happy girl :>

Here's what I bought finally, and I did show some restraints when I returned a few items at the cashier before I checked out the items :p

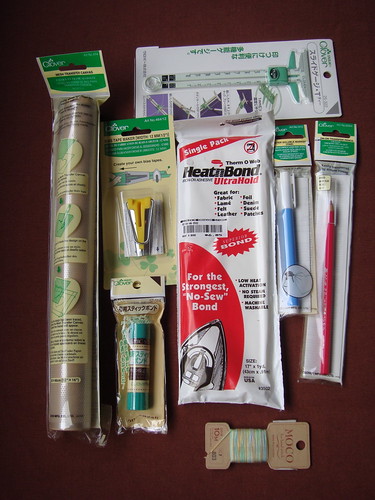
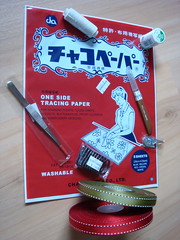
1) The mesh transfer sheet - handy for transferring quilting patterns without cutting out template sheets.
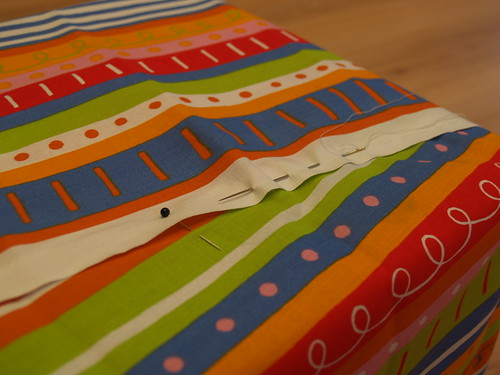
2) Bias Tape Maker - you need one for each size!
3) Gauge - which came in very useful when I had to fold over 1/8 seams in my last project. But this gauge is in metric, so I had to measure it against my other imperial rulers first.
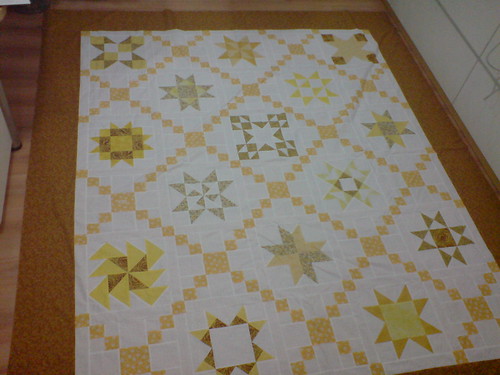
4) Water soluble marker - gosh, this works like a charm for me! Why I didn't get this much earlier is beyond me. LOVE IT! The marks wash out beautifully and most importantly, the marking is much more accurate and clear.
5) Iron-on transfer-pencil - I love the idea that I can trace out a pattern with this pencil and then transfer it to the fabrics just by simply ironing on it. Downside is that the markings will be permanent. No immediate plans/projects that call for this pencil yet. :p
6) Fabric glue stick - this will be useful for the applique works
7) Variegated thread - too pretty to be left out of the shopping basket ;>
8) Heat & Bond No Sew fusible web - I was thinking of making some 'iron-ons' for friends who don't sew. This is perfect for such 'painless' projects.

I do consider myself somewhat of a 'gadget-girl' (I love gadgets, but I don't go queueing up for iPhones just to be the first ones to get it...), and perhaps that explains why I fell in love with sewing again, after all these years. All the toys that you can buy for just marking patterns! For cutting fabrics! And once, I spent an entire day just search and surfing for various presser feets and their functions... And of course, the Internet has also made researching much easier and interesting, bringing me all the inspiring blogs of people who share their love & passion for their crafts.

Alrighty. Time to get back to work now and earn more $$ for my crafty fund (and Benji's diapers :p) ! ;>

Tuesday, December 16, 2008

Fabric Gift Wrapping 2

Here's a package of booky-goodies going to a friend in New York. Her family has moved from Singapore for almost a year now, and we bought some Chinese books for their 3 little ones, sort of like helping them to get in touch with their 'Asian Roots', so to speak :>

This came from Ikea's 'mini-bolt' which I love to buy. I used another one when I used fabrics to wrap a gift for another crafty mama's baby party.


This fabric wrap is a little more 'structured'. I based it loosely on a pattern in this book and while I don't have linen & silk, I do have loads of Ikea's cotton fabrics ;> The length of the ribbon is much shorter though, but given the thickness of these ribbons, I don't wish to add too much bulk to this parcel. Keeping it S I M P L E and S H O R T.

9 more days to Christmas! :>

Thursday, December 11, 2008

Cupcakes, anyone?

Now, who can resist a Spotlight sale? 20% percent off... I've expected the shop to be a scene of madness again, especially when it was the Hari Raya Haji holiday last Monday. While I was there for the buttons (for projects that I can only reveal after Christmas), I caved in and bought some poplin fabrics and felt too. The solids bundled on the right were picked up from Golden Dragon earlier in the day :p


Yummy...

Punch & stamp

Now, I have to perfectly honest with you. I can't draw. I can't even draw a stick figure well. And Benji's a psychic when he is able to figure out what the heck I have doodled for him when we do our 'ca-yon' sessions together.

So, in my quest to create things that people MIGHT find pleasing, I depend a lot on prints & templates, etc... This year, I finally caved in and stepped into a scrapbooking shop (cringe) to pick up some stamps. I'm simply intrigued by these clear stamps that Amy - the angry chicken - was talking about. And lo & behold, stamps from HEATHER BAILEY in the shop! I felt like I struck jackpot - I could not even find HB's freshcut fabrics locally, and yet I can buy her stamps?! WONDERFUL!

The girlies at the Made with Love shop were so helpful too. They helped me pick up a stamp pad (which can be used on fabrics... I'm skeptical still), stamp cleaner (I guess clear stamps need more maintenance than the rubber ones), and the 'acrylic' holder. Notice I didn't buy an acrylic block? Well, they were out of a lot of sizes, and what they have on hand are a bit pricey for my liking. But one of the staff said I can use these acrylic album sheets and they work just as well too. And best part of it: there are 2 pieces in there! And this is less than half the price of the blocks. BEST!

I'm intending to make gift tags out of these stock-cards. Here's one of the 'test' tag and see how super handy it is for adding in name/message? I'm hoping to make quilting labels with these stamps too. Hope they will stand up to washing! heh heh...

Christmas Skirting the issue

The Christmas Skirt is officially off the tree this year.

Here's a quick look at the 'finished product'. Nope. It's not been washed yet - I'm terrified of the colours running (I didn't pre-wash the fabrics for this project)... but let me figure out a way to get this in the wash without too much drama later on.


Applique close-up. Featuring the 12 gifts for the 12 days of Christmas.

The tree would have been PERFECT with this skirt under it. But, its not meant to be, for this year, at least. :p

So, we have 'relocated' the skirt to adorn the old-style coffeeshop table and placed the candlestickholder/wreath over the centre to cover the hole. Perfecto!

It's starting to feel a lot more like Christmas now! :>

Tuesday, December 9, 2008

My Christmas 'mini-Skirt'


AND THEN... I realised it was too SMALL for our tall tree! :( What a HUGE disappointment!

I should have at least measured the size of the tree stand when I started on this project, but I didn't. I'm so disappointed with this, and I even contemplated running out to buy a baby tree so I can dress it up with the skirt. But what am I going to do with 2 trees in the house? :(

So, I'm going to think up a way to use this skirt then... More pictures later.


I've been busy sewing up coasters for our Christmas dinner this year. And the cat is enjoying all the activity because she has a nice warm board to cosy up to after I'm done with it. :p


Let me go have a think about the Skirt now... headache, heartache! :(

Saturday, November 29, 2008

Benji's ca-yon wallet

Benji started to make a grab for our pens and pencils many months ago. So, we've invested in washable crayons for him to go crazy with. But he is limited to colouring only when we are at home, and at his little table, because we are so paranoid about losing the crayons in our bags and creating a mess, etc.

I chanced upon Jennifer's blog and she had created a crayon wallet tutorial - on sale at her Etsy store. It's great! Now, I can carry a scribble pad along with Benji's crayons, and it comes with a pocket to keep his masterpieces too :p

I used up some Ikea 'mini-bolts' left over from my quilted table toppers - more about that in a bit - they are not expensive and allow me to work on 'test-projects' :>

I've had these little chicky buttons for the longest time. I don't have a large button collection, and with projects like these, its a good excuse to go shopping now! ;>

I tried fitting in Benji's LARGE crayons but they were a little too tall for this wallet. The size is just right for the regular sized ones. But I've already 'discoloured' the wallet and side of the pad. But no worries, I expect this wallet to be filled with crayon bits and streaks sooner or later anyway ;>

The pad was supposed to fit the pocket on the right side. But I did not check if I had the pad that was the size of the pocket dictated in the pattern. But fortunately, the center pocket could fit the note pad (I had tons of these left from a fund raising event) well.

Overall, I'm very happy with how this turned out. I've bought Jennifer's other pattern for her quilted list-taker. Looking forward to see how that will turn out! :>

Monday, November 10, 2008

12 Days of X'mas - Tree Skirt

I've been complaining A LOT these days that the malls are putting up X'mas decor earlier each year.

On the other hand, I've been keeping my eyes open for X'mas gifts, planning schedules around the holidays and also keeping a list of things that I will need to do, clean, craft in time for X'mas. The X'mas tree skirt pattern caught my eye when I was at the local quilt shop. I attended a couple of sessions at Quilts and Sew Forth and this is what I have done up so far! :>


The creases you see are due to the folding and packing. I chose 7 different X'masy fabrics and a lovely beige/gold background fabric. I chose to cut out the 12 days of X'mas gifts from a panel for the applique, instead of tracing, and hand appliqueing other designs from scratch to the tree skirt. I simply used some Heat & Bond and machine sewed them with a blanket stitch. Quick & Easy! :>


The skirt is now basted and I will machine quilt this baby after I have joined the blocks for Benji's Zoo quilt. I'm looking forward to this skirt gracing our X'mas tree this year :>


Sashiko Coasters

Finally got round to completing the set of 5 coasters after choosing the backing fabric. Although the Sashiko coaster kit just require you to sew up the sides without any batting or backing, I chose to add on a lightweight iron on interface and a backing fabric.

I chose a dark Japanese print Kaufman fabric (almost black) with Kanji prints on it. I feel that it brings out the Japanese-ness of the Sashiko stitching.

I'm looking forward to completing the rest of the Sashiko kits!

A couple of busy months...

It has been a while since my last entry. And this blog, quilting, fabrics and sewing have been consistently on my mind! There have been several knitting projects completed (not photographed yet), many yards of fabrics bought (I can't even begin to keep track of them!) and many projects stated (I need to tweak the WIP column very soon!).

Last week, I found a really neat shop, Sin Hin Chuan Kee, along North Bridge Road. It's a traditional wholesaler shop (read: old and not great with displays) that packs lots and lots of goodies at great prices. I found Chaco paper for tracing Sashiko patterns, elastic threads, tweezers (for getting paper backing out from appliques), and there are a whole of goodies in the store! I bought 2 reels of ribbons at just about US$1.90 each for X'mas crafting too.


I was packing up my stack of WIP the other night, then I saw my Zoo blocks looking so cheery and bright... and neglected. I remembered planning for the borders to be a deep shade of red. What a perfect X'mas gift for Benji! And I started to get into the swing of things (if I leave it till 'later' again, I will not get it done!), and started tracing the fabrics, cutting them, and taped up my layout mat on the wall. I'm now sewing the rows together, then will put up the borders hopefully by end of this week! Yippee!

Monday, September 8, 2008

Fabric Gift-wrap

Last Sunday, we celebrated a crafty friend's baby girl's 3rd birthday. I decided to use the remnants of my Ikea 'mini-bolt' to wrap up this gift, so that the mummy can have some fun making her little girl stuffs too!

1) The present was first wrapped up with kraft paper first. Then I was deciding if I should use safety pins to pin the folds in place or fabric glue, or a ribbon to tie it all up?! Then DH had a brilliant idea for my to sew everything in place!

2) So, I 'wrapped' up the present as you would with your gift wrap paper. And pin and pin and pin the fabric into position.

3) Using a darning needle or similar, run your stitches along the edge of your fabric. Make sure you catch the bottom fabric! This is where the initial brown paper comes into play. The brown paper prevents 'injury' to the box when I stabbed too hard through the fabrics, etc.

As for the thread, I just use a single strand of polyester-cotton thread to sew this baby. No need to use strong threads as I wanted the gift recipient to be able to rip out the threads easily, and not damage the fabric!

You can consider the stitches to be almost like 'basting stitches', instead of real quilty stitches ;>

Lastly, I pinned a gift tag to the present with a curved safety pin. Sorry, no pic here. Did it on the fly just as the gang was at the door waiting to go for the party! :>

Tuesday, September 2, 2008

View from above...

We went for our ride on the Singapore Flyer last week.

Well, it wasn't VERY VERY spectacular, but Benji had a good time knocking on the cabin windows and very excited about the cars and machinery that are working on the Integrated Resort and the F1 Grand Prix track near the flyer.

When I look at the roads, with their uniform lane markings, all I could think of was: SASHIKO!

I completed my 1st placemat the other evening, and I'm starting on another new one, and the lane markings on the road, with the 'merging' arrows look very much like the markings and instruction on how to stitch!

Ok. Time to get off the computer and start sewing now ;>

Wednesday, August 27, 2008

Baby Quilt Top Done! Yaay!

Phew! My Gram's Fairy Tale baby quilt is done! I bought this kit from Fabric.com ages ago, and I've been progressing slowly with it for a long long while. I mentioned this quilt previously in a post here.

I dug it out of cold storage and started working on it again. The tedious bit was joining the triangles that made up the outer borders and joining them to the main body required some concentration - matching points, making sure that the points don't get cut off, easing in, etc...

Amanda Jean inspired me to work on this baby quilt with her Theme of the week. Although I'm a couple of days late in delivering this baby, there's nothing for me to lose as the top is now completed! :>

The instructions are clear and easy to follow and I do love the blocks and the fairy tale prints. I'm looking forward to basting and quilting than the Queen-sized Star QAL one :p

Sorry for the poor lighting again. Took this picture at around 3am in the morning when I put in the last stitch in the border. Well, the title of my blog is MIDNIGHT CRAFTS indeed! ;>

Tuesday, August 19, 2008

Star QAL Top DONE


Okay, I'm sorry that I could not take a better picture. But the weather has been dreary and wet for the past 2 days and I only have my mobile phone handy now :p I will try to get a better picture when I have more hands on deck to hold this baby up! :>

The top is DONE DONE. I'm so glad!!! But it is HUGE. My back is already aching just THINKING of the basting I have to do on my hands and knees :p

I'm not in a hurry to quilt this one yet. I will probably quilt it when I complete my Zoo Stack and Whack baby quilt top, buy a few more needles and get into the mood before I tackle the quilting.

Thanks to AmandaJean, this has been fun, fun, fun :> Yes, its true that you can work out a quilt all by yourself. But when you have so many others quilting along with you, and someone committing herself to lead this project, you appreciate the effort and heart in this :>

Already looking forward to the next project! WOOHOO!

Sunday, August 17, 2008

Good Buy

I have a small working area and a smaller ironing board. and I HATE it when the wire gets in the way (and cause more creases) when I have to press those backings or bigger quilts.

And I found this beauty at the departmental store today. It costs about US$40.00 and I HAD to have it. It is a medium weight dry iron, different from my regular steam iron (I don't use the steam function for the quilts) which weighs next to nothing :p These lightweight steam irons are good for clothes, but not quite the thing when it comes to quilts!

Hubby was surprised that I would want an iron this heavy :p I explained that quilting is about PRESSING, not'ironing'... I think that left him more confused than ever! haha.

I've just applied the border to one side of my Star QAL and I'd love to try out this iron on the quilt then. I have not fired up this baby yet - not in the greatest shape to stay up in the studio tonight and sitting at the machine. I think I'm coming down with a flu or something... throat's a little scratchy and bones a little achy... not in the mood to get on the floor to pin the borders on tonight. Guess I will continue with my handquilting my sampler in bed then! ;>

Have a great week ahead!

Monday, August 11, 2008

About Stars and Sashiko

I've made some progress with my Star Quilt-A-Long project and I'm happy to say that I have completed all 30 blocks and cut up all my sashings/cornerstones, waiting for sewing now :>

There has been a number of completed tops at the group's flickr folder and I thought that the quilt is 'too square' to fit into any rooms in the house. haha. A quick calculation shows that I can turn this into a Queen-sized quilt with an additional row. So, I added 2 more Stars and 3 more setting blocks.

And I also took some time to pick out my border and backing fabrics too, and they are washed and ready to go when I'm done piecing the top together.

You can see the preliminary layout below, without the sashings/cornerstones/borders. I have a piece of tape on each block to indicate which row/column they belong to, so I don't have to bother with laying them out again until they are joined.


Here are my 2 additional blocks - Dutchman's puzzle and a 9-patch star.
Recently, I found that my quilt shop carries Sashiko needles and I got really excited (for nothing). Unfortunately, the shop does NOT carry the Sashko kits/fabrics or even threads. It has been very painful looking for Sashiko stuffs in our local craft shops . And that of course gave me an excuse to shop online ;> Bought a bunch of placemat kits, some samplers and also sashiko threads. Of course, I did not have the patience to get my camera and snap a picture of the parcel as-is, but I remembered to take a pic of my spree here after I started stitching on a few coasters.

I felt that the threads supplied in the kit are not as good as the ones that you buy 'ala carte'. They seem to be more loosely twisted and a bit harder to pull through the fabric. So I'll probably just buy the sampler or the marked fabrics in the future. This is my 1st attempt at Sashiko sewing, though I've known of it for a while. Never got the chance to try my hands at i till now, because they are almost impossible to find in Singapore.

Then I visited the bookstore and bought The Ultimate Sashiko Sourcebook by Susan Briscoe which is really packed with loads of Sashiko history and patterns for reference. I. Love. It.


Loads of WIPs since the beginning of the year, and I sure hope I have more finished projects to show for in the coming months.

Thanks for sewing with me!

Thursday, July 24, 2008

More blocks!

Completed 2 more blocks for the Star QAL. Saw a completed top at Flickr and I can't wait for mine to get done too! :>

Here's Week 8. See how hard I'm trying to use up the ugly yellow flower fabrics? I must be careful that I don't turn it into the main feature fabric of the quilt! hahaha. But I think this print is going along quite well with the rest of the yellow prints :>

Here's Week 9. More ugly yellow flower. But I kindda like it here :>

As if I don't have enough UFOs, WIPs and what nots lying around. I started on yet another project with my quilting friends - Stack and Whack. Its really fun fun fun! I'm using a Quilting Treasures print for this Baby Quilt, for my son. I REALLY love how the blocks turned out. I guess if with better pinning, cutting, sewing, and pressing, the kaleidoscope effect would be phenomenon. So, gotta practice some more then ;>

First 6 blocks...

Then another 6 makes 12 blocks!

I LOVE the zebras & flamingos...

One of my favourites! :>

Before I go, here's a look at my latest spree on eBay :p Bought some AB fabrics online too. Can't wait to get started! MUST start at least ONE pattern this year! hahaha... I don't dare to commit to COMPLETING a project... to be able to finish one would be a great X'mas pressie for myself then ;>

Goodnight, my sewing friends!

PS: Amy has a new book Little Stitches for Little Ones... LOVELY... :>

Tuesday, July 22, 2008

Playing catch up

My Yellow Star Quilt has been quite neglected (along with other UFOs). There is so much to do - work, baby, house, MarioKart Wii (:D) that I feel bad sewing with all these stuffs at the back of my mind.

The thing about sewing is that once you start, it is VERY hard to stop ;>

Last week, I cut up all the fabrics for Weeks 6 through 11 in a single night and went to bed with a sore back... Today, I put aside my work and sat at the sewing machine for a while and I completed 2 blocks (Weeks 6 & 7) and finished ALL my setting blocks! YAAY!

I think that the setting blocks look pretty on its own, but when I placed a star block next to it, I find that the setting block pieces look very bright orange. But as I laid out more blocks, I think it is turning out okay as the setting blocks act like 'frames' for the stars. Nope. I don't have a picture of the blocks laid out here. Spent the time sewing instead! HA!

Week 6's block. I'm using up the ugly flower fabric here :> Gosh, I'm glad to get rid of them here!

Week 7's block and this one I LIKE!

Week 7 and 8 pieces laid out here. I have the week's cut pieces separately bagged. And I'm doing them 2 blocks at a time. The missing bits of the blocks are at the sewing machine :p

I really had a good time doing these setting blocks. I like the fabrics and I like the easy piecing that turns out so neatly too! Took the 'production line' way and chain pieced, chain sewed and chain pressed the pieces. And I had the greatest satisfaction by completing 12 blocks at one go!

Another reason why Star QAL took a backseat for the past couple of weeks is because I started on a really fun quilt for Benji ;> More pictures coming up soon! :> Till then, happy stitching!

Wednesday, July 9, 2008

Missed it :(

Gosh! I can't believe I missed it!

We were notified earlier that Splatter was coming to Singapore for an exhibition. I meant to go down and visit the booth to see if I can get more paintings for the home.

At Splatter's last show in May at Journey East, we bought his paintings from his Year of The Rat collection and he did a quick sketch for Benji too. Spelled his name wrongly, but we are cool with it. ;> Oh, its a piggy because Benji's born in the year of the Pig!


Totally bummed that I missed it... but I think DH is secretly happy that his wallet is saved! :p

Monday, July 7, 2008

Distracted

It's been a while since my last post. Not to say that there has been much going-ons, but on the sewing side, it has been a bit more quieter ;> Not a bad thing, actually.

Let me explain.

We took another road trip with the family to Malaysia again, and it was great! We enjoyed the cool air of Cameron Highlands and of course, the yummy food. I packed away my sewing machine and cleared out my sewing corner before we left because there was some renovations done in our absence. I have not reinstated the machines, mats, etc because the work is still not done to our satisfaction yet.

BUT I have been hand quilting every night for the past 2 weeks, and it IS getting easier and quicker (relatively) for me. I have completed 2 blocks and starting on the 3rd one now.

The other reason why I have not caught up with AmandaJean's QAL is also because of this:


My hubby bought this for my 'small' 3-0 birthday. And we have been racing each other at MarioKart at every chance we get! :>

Ta, for now. I will be back with more news of 'gifts' I bought for myself! hahaha.

Thursday, June 5, 2008

Sweet dreams...

Benji's back into teething mode again. Approaching 16 months, and only 5 little pearlies, he has a lot of teeth to catch up with! We have to change bibs so often that I'm running low on stock by midday. And when we put him to bed, we noticed that he is trying to chew on the pillow covers, etc. Poor boy.

Benji goes to bed with a bolster and I can't simply find reasonably priced and attractive covers for it. So, I decided to use the pattern off the ugly one that we bought off the shelf and make him new ones. Here's my first attempt at it, and also at machine applique too! The 'insects' came from some fabric I bought from Spotlight. Great for a 'quiet game' of I Spy at bedtime then ;>

A close-up of one of my favourite patches. I also added in the cords at the seamline of the 2 fabrics, so that Benji can 'gnaw' away.
It was super quick to make and great fun too. I really wanted to get it done fast (started it yesterday afternoon and brought it for wash moments ago) so that my baby can go to bed with a cool cover! :>

Tuesday, June 3, 2008

Power up :>

This weekend has been fun fun fun! We caught up with some friends and she made us a really good dinner, and the kids enjoyed themselves very much too.

I also felt that Benji has grown a lot in these past few weeks. As he turned 15 1/2 months, he took his first steady steps last week and today he managed to stand himself up without holding on to any furniture, or legs, or walls. And he also finally figured out how to get in and out of his favorite push-car! It's great to see him playing with the older kids and learning to be more independent because of his newfound mobility.

My parents came back from their vacation and they were exclaiming how much Benji has grown (in 10 days) and so many new tricks learned. One thing's not changed - he still has his bib around his neck! Yah, my son has a MAJOR drool issue.

Over the weekend, I power-sewed. I cut up the borders for my Tales & Tidings quit, I also caught up with AmandaJean's Star Quilt-A-Long and also cut up the fabrics for the 12 setting blocks. Phew! Chain-stitching frenzy! Half-way through to making the 48 X 4-patch pieces.

Here's Week 3's block. I 'fussy-cut' this orangey bloom fabric, which I don't like very much. I think it turned out quite nice here! :>

This is Week 4's block. The colours turned out more orangey with this camera. Just try to imagine it more 'yellow-y' :>

This is Week 5's block. Tiring, but pretty block. After all the triangles, it was just good fun to cut strips and squares to work on the setting blocks.

All in all, I'm pretty happy with the progress made so far. Fell back a few weeks because of vacation, etc. But once you get into the swing of things, the blocks came together pretty quickly :>